It’s so tough for me to believe but it has been over three years since our wedding. Yes, three years! When I set out with this blog I wanted to share all the details of our wedding planning, projects, and the outcomes. And even three years later there are things I’m realizing I have never shared! A lot of things, actually!
Three years ago, around the time of our wedding, I was an intern for DIY Bride. I was helping out with behind the scenes stuff, ad sales, and their real wedding spotlights. I also created a couple DIY tutorials. In light of DIY Bride’s announcement this week that they are shuttering, I want to move some of the content I created for them over to my own blog, in case it disappears forever. One of those posts is all about how I made my ribbon veil.
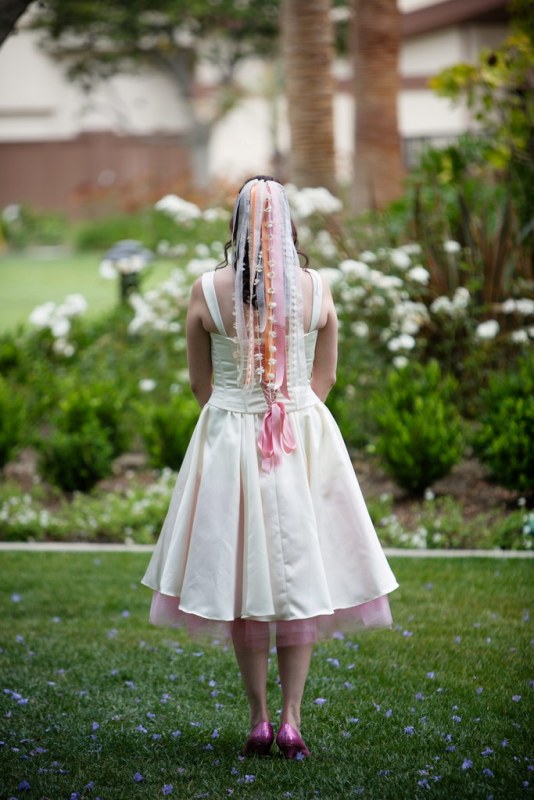
Below is the post as it appeared on DIY Bride, mostly. I added some new images and changed the wording around a little. I truly loved my ribbon veil; everyone was skeptical about it but I had faith it was going to turn out to be amazing, and I have absolutely no regrets about it! It’s such a simple DIY; the toughest part will be finding the right ribbon! (Side note – I kept searching for the perfect ribbon at Dollar Tree and Joann’s – and some of my ribbons are from both locations – but eventually I sucked it up and purchased pricier, higher quality ribbon from PaperSource and it was well worth it, and I also used the ribbon in other projects. So don’t be afraid to spend a little money on this one – it still will be way cheaper than a store-bought veil!) Still, even with the pricey ribbon, I made my veil for under $30 – a downright steal when compared to the tulle veils sold in bridal shops!
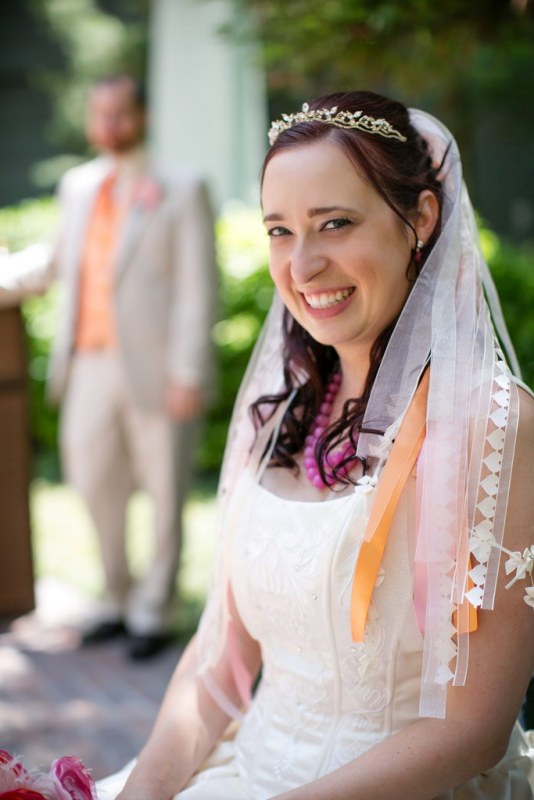
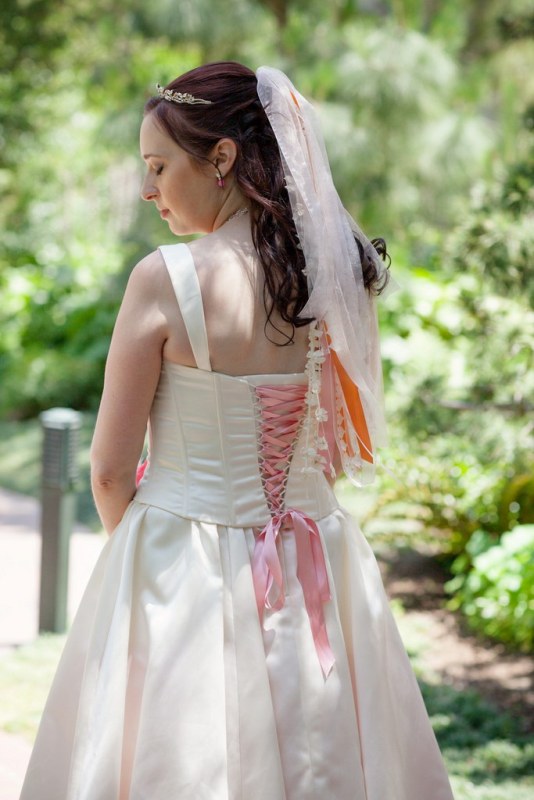
My husband and I were married at The Disneyland Hotel in May 2012. I had always dreamed of a fairy tale wedding day at Disneyland but was scared of the price tag. I knew if we were going to make it happen, I would have to get very creative and do a lot of DIY projects. Projects we (yes, my husband helped out a ton!) did ourselves for the wedding include making almost all of the floral ourselves out of fabric (the only real floral we had was the floral Disney used to decorate the ceremony gazebo and rose petals on the aisle), our stationery, card box, vases, confetti, and photobooth props. I even DIY’d my earrings, shoes, and veil. The veil was my first DIY idea and also the one thing I was most concerned about, because it’s a bit nontraditional. I was pleasantly surprised at how many compliments I received on my veil during our reception!
I loved my ribbon veil so much, and it was so easy and cheap to make, I thought I would share a tutorial with you all!
First I have to give credit to the inspiration behind this project, which is Ariel from Offbeat Bride. She wore a ribbon veil on her wedding day and I fell in love with the look, but she wore hers with buns and I wanted my hair to look a little more “bridal traditional.” So I decided to make my ribbon veil with a hair comb.
First, decide on your colors. Our wedding colors were pink and orange so I chose various ribbons in shades of these colors, along with ivory to match my wedding gown. (Side note – Get a swatch of your gown color from the bridal shop, or if you are getting your gown altered, see if they can snip off a piece to carry around with you. I kept a little piece of my gown in my wallet so I always had it with me when I went to craft stores.)
Decide on the length you want your ribbons. I wanted mine to my waist, so my husband helped me measure the approximate length. Double up on the length you want and then cut the ribbon. Repeat as many times as you want (or will fit on the comb!).
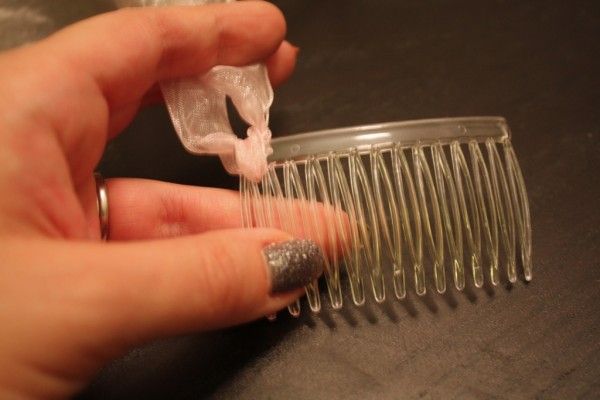
Next, find the midpoint of your ribbon strand and tie it in a knot between the teeth of the comb. I wanted a really full veil so I tied a ribbon between each tooth of the comb. Stagger the colors if you’re doing more than one color.
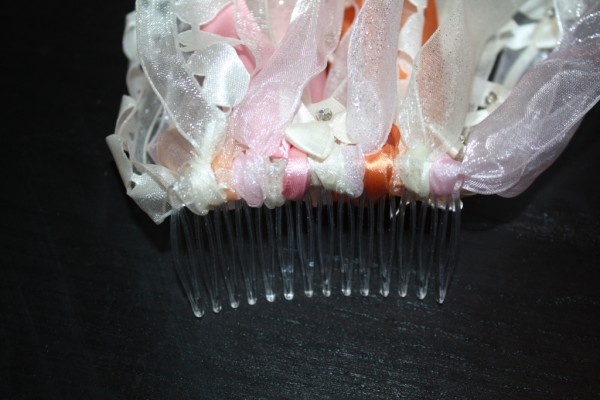
Flip the ribbon over the comb so it covers up the actual comb (the part where you tied the knots should be “under” the flipped over ribbon, if that makes sense). That’s it! If you want, you can vary the lengths of the ribbon to create a bit of texture. And the nice part is, if you cut too short and aren’t happy with it, it’s easy to replace the ribbon strand.
And that’s it! Once you have all your ribbon collected, it will take you less than an hour to make your veil. So easy, and so effective. One more side note – I had to iron a few of the ribbons the morning of my wedding since they got wrinkled during transport, so be sure to do an iron test on the ribbon you’re using BEFORE the morning of your wedding.
Enjoy your veil, and don’t forget to pull it out of storage and wear it on anniversaries!
Wedding day photos by Root Photography
Hair and makeup by Fairytale Hair and Makeup