This post contains affiliate links.

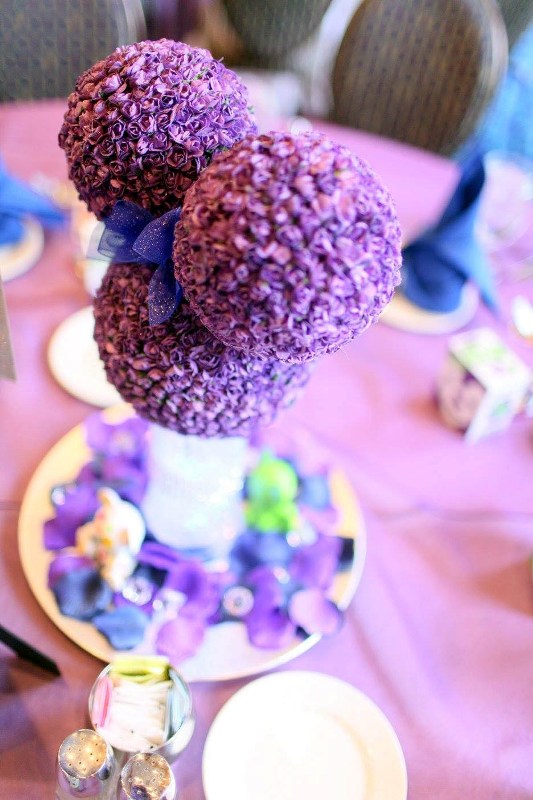
Today Disney Bride Sylvia is sharing how she, along with her husband Jeff, made their DIY rose Mickey pomander centerpieces for their wedding at Disneyland. I actually was a guest at their wedding and their centerpieces looked amazing in person! A lot of thought and work went into them, and the end result was simply beautiful. I’m so glad she agreed to share how she made them so other brides and grooms can be inspired by this decor. Thank you, Sylvia!
I knew I wanted to make Mickey pomander centerpieces after seeing a few inspiration photos online. Jeff and I went to Michael’s to play around with supplies. We basically started with the vase first, then sized Styrofoam balls with it until we found a combination we thought looked good. If you do this project, I recommend starting with the vase because you can buy Styrofoam balls in virtually any size to match up with the size of the vase. You basically want the bottom of the pomander to balance inside the vase a little bit, so it doesn’t easily fall off.
We opted for a Libbey Glass Tower vase, which were $3.99 each at Michael’s. We also used coupons which helped bring the cost down.
DIY Rose Mickey Pomander Centerpieces
Supplies (per centerpiece):
2 – four inch Styrofoam balls
1 – seven inch Styrofoam ball
2 – mini wood craft sticks or dowels
Hot glue gun and glue
Purple metallic spray paint
Purple glitter spray paint
Roughly 700+ miniature silk roses (similar)
Clear vase
Water gel beads
Underwater LED lights in blue
Rhinestone ribbon
Steps:
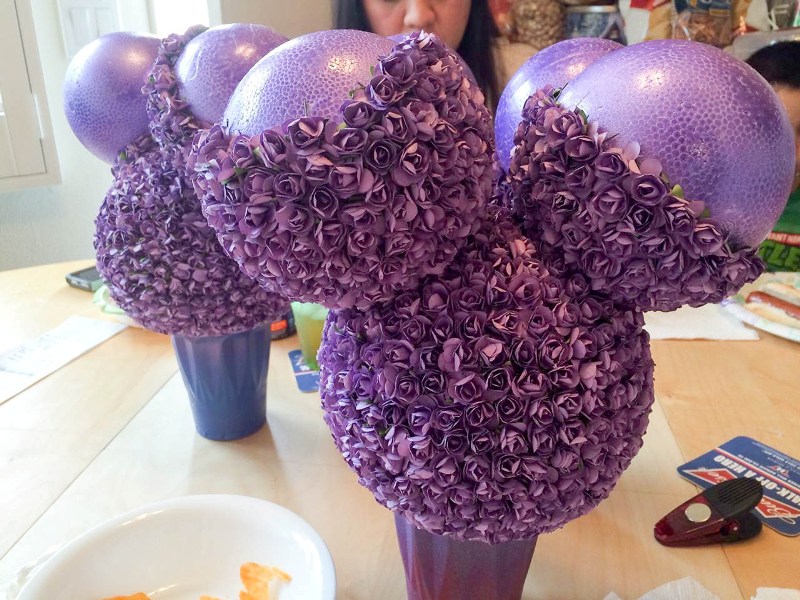
Step 1 – For the silk roses, this project works best if you purchase them with stems. Jeff became the official flower cutter and cut all the roses for the project, leaving a very small stem to work with.

Step 2 – Spray paint the Styrofoam balls in a metallic shimmer that is similar to the color of the flowers. Once the Styrofoam is dry, use mini wood craft sticks to anchor the “ears” (smaller balls) to the “head” (larger ball). We simply eyeballed the distance for the ears to be set. Once you have the anchor holes in both ears and two holes in the Mickey head, remove the sticks and add hot glue to the holes in the ear pieces and then replace the sticks. Then repeat with the head piece so now everything is attached and in place. Let dry.
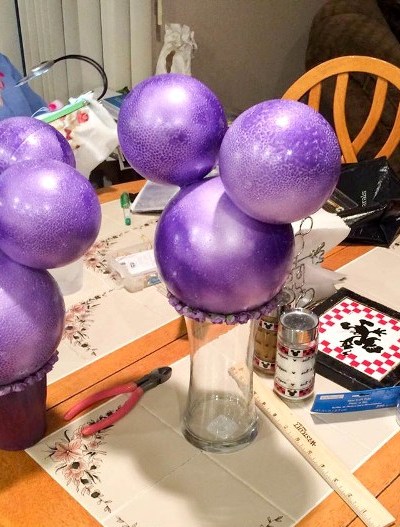
Step 3 – Place the head on the vase and use a sharpie in a similar or lighter color to mark where the head meets the vase. This is to indicate where you’ll start placing flowers.
Step 4 – Using the hot glue, apply a row of roses just above the line you drew. Then continue gluing roses until the rest of the Mickey head is covered with roses.
I found it best to work on the head part of the mickey pomander first. I started with hot gluing flowers around the base of the ears (both sides) and then create a bridge across to the other ear base. Then I flipped the mickey back upside down and would do about 3 rows worth of flowers around the base to ensure that they were set. I then would finish the mickey heads and move onto completing the ears. I would try to place the flowers as tightly as possible to avoid holes in the pomander.
Once all the flowers are in place, allow the pomander to dry completely overnight before doing anything else.
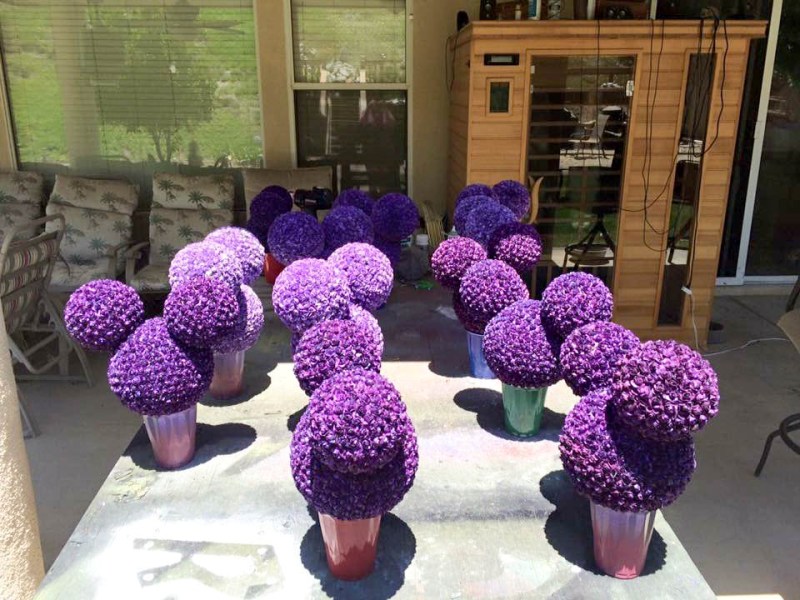
Step 5 – (Optional) Apply a coat of glitter spray paint to the pomander. Be sure to test it in a section first before you do all of them, to make sure you like it. We found the spray made the roses a little bit darker and more firm, which we liked. And they were so sparkly in the light!
Step 6 – Add a strip of rhinestone ribbon around the center of the vase and place about an inch of the water beads on the bottom of the vase. Then add one LED light facing up. Fill the rest of the vase up with the water beads until you have about an inch left at the top. Then add a second LED light facing down. You can push it down into the beads a little bit.
Step 7 – Rest the Mickey pomander on top of the vase. If you want, you can add a cute ribbon to the top to turn your Mickey centerpiece into a Minnie centerpiece!
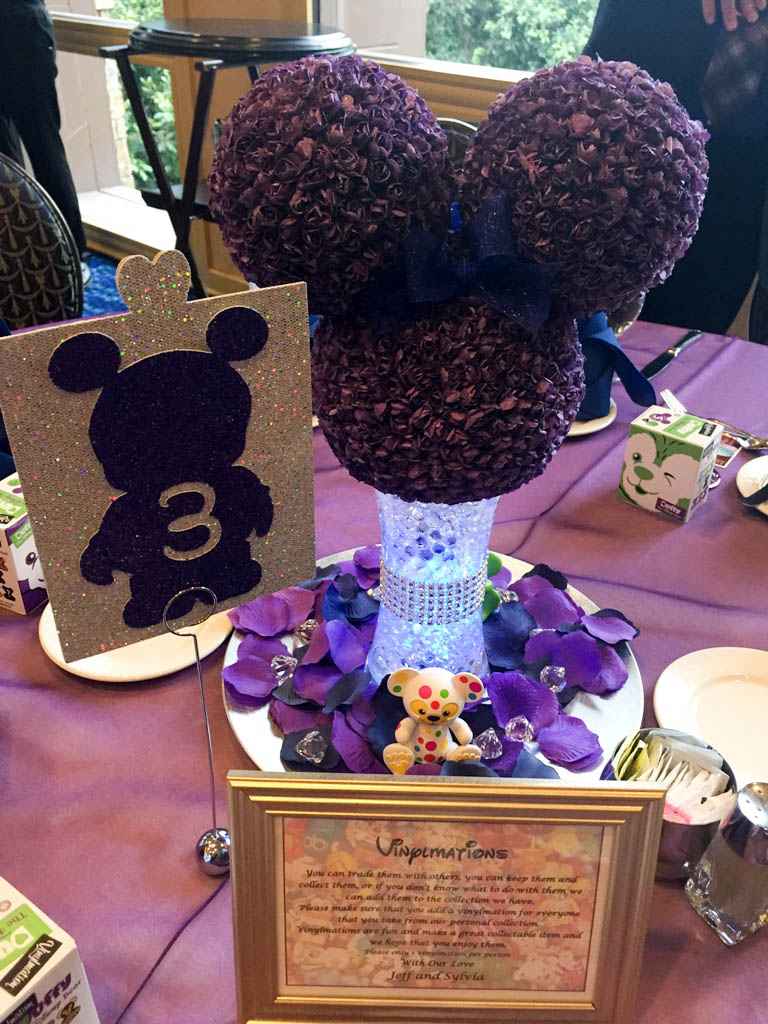
And here’s a pro photo from the wedding by Playful Soul Photography.
These came out AMAZING, Sylvia and Jeff! Thanks so much for sharing them with us!