
For the longest time I’ve been wanting to tackle wire Mickey ears, and this year I FULLY jumped in. So far I’ve made three wire ears in the last month, and if you follow me on Snapchat or Instagram Stories, you’ve seen them all. I asked you guys on Instagram which ears tutorial you wanted me to write up first, and overwhelmingly you guys chose the lace ears!
I admit I had bigger plans for these lace ears when I first started making them. I was going to add a big black bow in the middle and make a small flower crown with black silk flowers. I was going for a super gothy Halloween look. But after I added the lace, I thought they were so pretty I couldn’t bare to alter them any further! Maybe someday I will add the bow or the flowers, but for now I love this black lace Mickey ears just as they are. And I’m so glad you love them, too! I made mine for Halloween but they are great for wearing to the Parks any time of year! And they don’t have to be black; you can get creative with the colors. I think I will probably end up making a pair in white, too. And of course …. pink!

This tutorial is a little extensive, but don’t let it fool you! After a trip to the craft store for supplies, you’ll be able to get these done during one re-watching of your favorite Disney movie.
DIY Black Lace Mickey Ears
Supplies
Black floral wire (12 gauge)
Black headband
Black 1/2″ ribbon
Hot glue gun
Black lace
Black thread and needle
Glue stick
Black masking tape (3/4 inch)
Needle nose pliers/wire cutter combo
Be sure you protect your workspace before you begin.
Steps
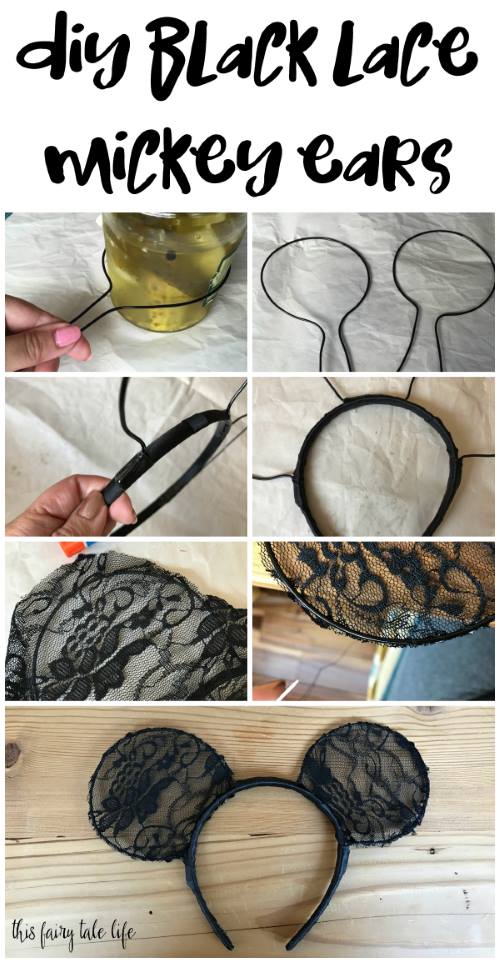
Step 1 – The first step is to shape your wire ears. I wanted to make my ears a little bigger than the traditional ears and I found a pickle jar was the perfect size. Look around your home and get creative as to what you can use as a size guide! Wrap the wire around the pickle jar until you have a complete circle, and trim the wire with about 2 inches sticking out on both sides. Do this twice for your two ears.
Step 2 – Place your wire ears using a pair of official Mickey ears as your guide. Once you have the right placement, trim the “edges” of the ears to about one inch, then use a piece of black tape to secure the edge to the headband. Repeat on the other side of the ear. Then repeat for the second ear.
Step 3 – We’re going to want to cover up that tape because it’s a bit ugly, so we are going to wrap black ribbon around the entire headband. Start by securing the end of the ribbon to the inside bottom edge of the headband with a small dab of hot glue. Press firmly and let dry before you start wrapping. Be careful as you wrap the ribbon near the ears. The ears are easily bendable. When you reach the other end of the headband, trim the ribbon and secure to the inside of the headband with another dab of hot glue. Press firmly to secure and fully dry before moving on to the next Step.
Step 4 – By now you should have a nice pair of black wire Mickey ears, and you can stop here if you want to! If you want to add lace, cut out a piece of black lace that’s just a bit bigger than one ear. Then cut out a second piece of lace around the same size for the other ear.
Step 5 – Decide which side of the ears you want to be the “back,” as this is where you’ll glue the lace to the wire ears. Lay the ears on the table with the “back” side up. Take the glue stick and run it along the back of one of the wire ears. Gently place the lace on top and press it against the wire to secure it to the glue. Your fingers WILL get sticky here. Repeat with the other side, then allow the glue to fully dry.
Step 6 – Once the glue is dry and the lace feels securely attached to the wire, carefully trim the excess lace around both ears.
Step 7 – Even though the lace is attached to the wire ears with glue, it still feels a little flimsy, so I took the extra step of securing the lace to the wires with black thread. Thread your needle, then tie the end of the thread to the bottom of one ear and knot it, so it’s secure around the wire. Then sew loops around the wire, all the way around the ear, then secure with a knot at the other end of the ear. Repeat with the second ear.
Step 8 – The final step is to use the glue stick to glue the bottom of the lace ear to the headband, then trim off any excess lace once the glue dries.
Congrats, you now have a pair of DIY minimalist black lace Mickey ears! From here you can leave them as-is, like I did, or you can jazz them up with a flower crown or a bow in your favorite color. To be honest, I kind of like them just as they are! And I got so many compliments when I wore them to Mickey’s Halloween Party.
Be very careful with your lace ears because they are VERY delicate. You’re not going to want to toss these in a backpack with the rest of your things and carry it around all day. Handle with care!