• About Me
  • Resources
  • Submissions
  • Advertising/Disclosure
  • Skip to primary navigation
  • Skip to main content
  • Skip to primary sidebar

This Fairy Tale Life

Your Fairy Tale, Your Way

  • Home
  • Disney
    • Disney News
    • Disney Weddings
    • Beauty and Fashion
  • Travel
    • Disneyland
    • Walt Disney World
    • Aulani
    • Our Mediterranean Honeymoon
    • Cruising
  • Weddings
    • Considering a Disneyland Wedding?
    • Our Wedding
    • Real Disney Weddings
    • Disney Engagement Shoots
    • Wedding Planning Course
  • Lifestyle
    • Beauty and Fashion
    • DIY
    • Fitness
    • Food
    • Wellness
  • Blogging
    • Blogging
    • Income Reports
  • Latest Posts
  • Show Search
Hide Search

DIY Sally Painted Pumpkin

October 29, 2013 · By Mindy · 12 Comments

26 Shares
Tweet
Share13
Pin13
Share

This is the story of a DIY project gone wrong, and turned into something more amazing than the original idea.  And I’m posting this to tell you that DIY projects will fail, things don’t always turn out the way you expect, and sometimes your best ideas come to you while you’re trying to slip into a Benedryl-induced nap, forcing you to get up and search through unpacked boxes for a Sharpie.

This is the story of my Sally inspired no-carve painted pumpkin!

Budget Fairy Tale: DIY Sally Painted Pumpkin

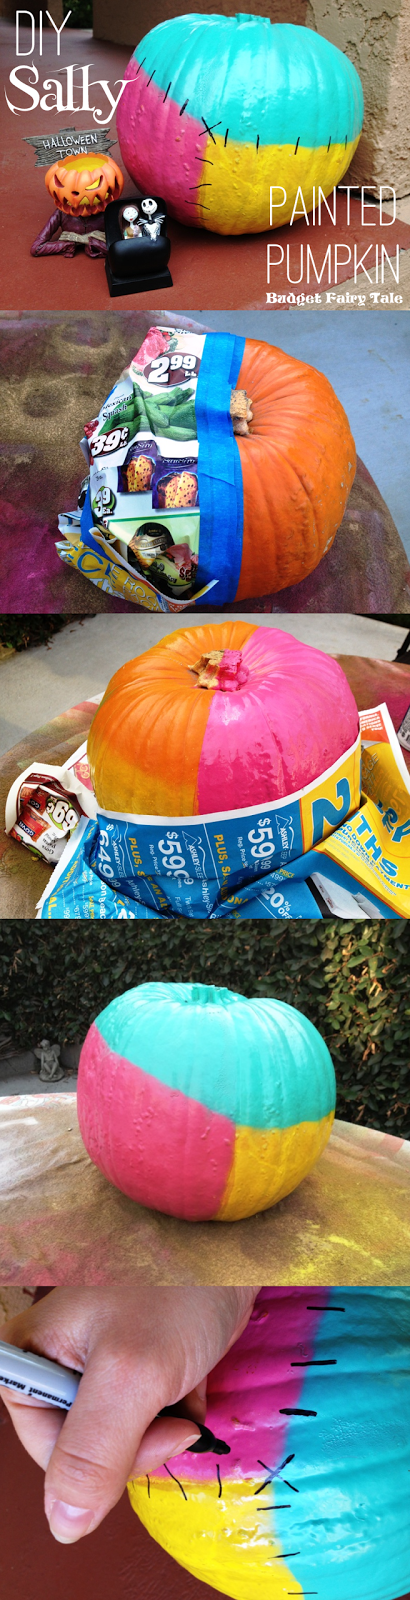
Like I said, this wasn’t meant to be a Sally pumpkin.  I set out to do a color block pumpkin and my project didn’t come out “perfect” and I considered it a failure.  What I learned from this project is that you can’t put painter’s tape on top of a painted pumpkin!  The paint will come off with the tape.  Oh, the horror!!!!  This project actually sat for several weeks because I was so frustrated!  Then I decided to improvise and it didn’t work “perfectly” and I almost threw my pumpkin away!!  I’m so glad I didn’t because I love the end result.  It’s still not “perfect” (do you see that I’m putting this word in quotes?  That’s because there’s no such thing as “perfect” in DIY-land), but I love my little ragdoll pumpkin.

Here’s how I made it.

Step One:  Get a pumpkin.  Use painter’s tape to tape off a section of the pumpkin.  I decided to do one half of my pumpkin in pink …. but you can tape off any area of your pumpkin that you desire! I first used painters tape to make the “edge,” then I used more tape and junk mailings to cover the part of the pumpkin I didn’t want painted.

Budget Fairy Tale: DIY Sally Painted Pumpkin

Step Two:  This is where I found out that painter’s tape will pull up dry paint on a pumpkin.  (And I let it dry overnight, so wet paint was not the culprit.)  So I had to improvise, and decided to simply hold up a peice of newspaper to make an edge and spray the desired area.  What a mess!  Not only did I get paint all over my hand, but my yellow paint is kind of old and it was gross and drippy.  I got the edge I wanted – kind of.  From far away it’s okay but up close it’s a hot mess.

Budget Fairy Tale: DIY Sally Painted Pumpkin

I then used this same sloppy technique to paint off a blue section on the top.

Budget Fairy Tale: DIY Sally Painted Pumpkin

Budget Fairy Tale: DIY Sally Painted Pumpkin

Budget Fairy Tale: DIY Sally Painted Pumpkin

After I was done with my pumpkin, I looked at it and thought, “Funny, those are kind like Sally’s colors.”  Then I shrugged and walked away, totally disappointed with my failed color blocking attempt.

I was experiencing bad allergies that day so I actually decided to take a Benedryl and lay down for a nap.  As I was dozing off, I came to me … add black stitching along the edges to represent Sally’s ragdoll gown!  (My best ideas always come to me when I’m almost asleep and in the shower, and don’t have the capability to write anything down.)  I drowsily searched the house for a black Sharpie.  It was quite comical, considering how sleepy I was and how half my possessions are still in moving boxes.

Step Three: Use a black Sharpie to add smal lines where the colors meet to make the patchwork stitching!  I added a few “x” marks here and there, too, mostly to cover up paint imperfections!  I think the uneven lines work better for this design because Sally’s dress is meant to be haphazard and imperfect …. kind of like me.

Love this project?  Please Pin It!

My friend Rosaura said, “Half of art is just creative problem solving.”  She’s totally right!  Art is never perfect and is never really finished (like Disneyland!) and if something you are creating is not matching your vision, step away from it for a bit and I bet the solution will come to you!  And I want to give a special shout out to reader Nadia who had the same turn-it-into-Sally idea that I did!  We are clearly both geniuses.  (And HAPPY DISNEYLAND WEDDING DAY tomorrow!!!!!)

***
Have you ever failed big time at a DIY project?  Is this fail even worse than my epic DIY glitter shoes fail?  Or did I manage to salvage this one?
26 Shares
Tweet
Share13
Pin13
Share

Comments

comments

Filed Under: DIY Tagged With: DIY, Halloween, Nightmare Before Christmas, Pumpkins

Reader Interactions

Comments

  1. TheNameIsCasie says

    October 29, 2013 at 3:57 pm

    I.LOVE.THIS! What am AMAZING “happy ending” — I’m always SO SO nervous to get started on projects. That tiny voice always chimes in, “What if you screw it all up?” — ahhhhello, I still have purely stark white converse sneakers that I’ve only been contemplating doodling upon for well over a year now for this exact reason. And…a memory book I have yet to start because…of, well the same dang reason. BUT! This is a total inspiration, and truth be told I’ve had TONS of projects not turn out “perfectly” — only to turn out even far superior to what I ever could’ve planned. Well Done!! 😀

    Reply
    • Mindy says

      October 29, 2013 at 11:42 pm

      Thanks so much, Casie! I know – I feel the same way about projects … they never look as good as I think they will! I think it’s important for people to know that most DIY projects aren’t perfect like Martha’s.

      Reply
  2. Mary says

    October 29, 2013 at 7:22 pm

    I love this idea. Great for the younger kids too.

    Reply
    • Mindy says

      October 29, 2013 at 11:42 pm

      Yes, it’s an easy project for kids and less mess than carving! (Maybe … I guess it depends on how messy the kids are – haha)

      Reply
  3. Disney Day by Day says

    October 29, 2013 at 8:52 pm

    What a fun idea, I love it!

    Reply
    • Mindy says

      October 29, 2013 at 11:43 pm

      Thank you!

      Reply
  4. Hope at Disneyland says

    October 29, 2013 at 11:39 pm

    I think the original painted pumpkin looked good, but adding the stitching and making it more overtly “Sally” is even better!

    Reply
    • Mindy says

      October 29, 2013 at 11:43 pm

      Thanks for thinking my original pumpkin looked good on its own *blush*

      Reply
  5. Melissa Knight says

    November 2, 2013 at 8:27 pm

    This is such a cool idea! We didn’t decorate pumpkins this year but I pinned it so I can do this next year!

    Reply
    • Mindy says

      November 2, 2013 at 8:57 pm

      Thank you for pinning!

      Reply

Trackbacks

  1. 25+ No-Carve Pumpkin Ideas - Songbirds and Buttons says:
    September 10, 2014 at 10:31 am

    […] Sally Painted Pumpkin // Budget Fairytale […]

    Reply
  2. 30 Non-Traditional Pumpkin Ideas - Hairspray and Highheels says:
    October 4, 2014 at 9:00 pm

    […] DIY Sally Painted Pumpkin  //  Budget Fairy Tale […]

    Reply

Leave a Reply Cancel reply

Your email address will not be published. Required fields are marked *

This site uses Akismet to reduce spam. Learn how your comment data is processed.

Primary Sidebar

  • Email
  • Facebook
  • Instagram
  • LinkedIn
  • Pinterest
  • RSS
  • Twitter

Featured Articles

Celebrating Christmas at The Disneyland Resort Hotels and Downtown Disney
Black Friday and Cyber Monday Sales
Black Friday Deals for Bloggers
Disneyland After Dark - Special Park Events for Grown Ups!
Make Everyone Jealous of your Holiday Cards with Minted

Copyright © 2019 Saccarzec Industries · Site design by Olive & Ivy Design · Privacy Policy