
This post uses affiliate links.
Here’s something I’ve never written before, and probably never will again:
This DIY was inspired by Beyoncé.

Yep, it’s true! This DIY Mickey ears beanie was inspired by Queen Bey herself. (That’s what all the kids are calling her these days, right?) I stumbled upon this picture of B sippin’ on no-no juice and sporting a super cute black Mickey beanie. Or … at least that’s what *I* saw. After some research it turns out it’s a bear beanie.
Well, whatever. The DIY seed had already been planted. I discovered this image in the spring and thought it would make a good DIY to make for the winter – but then we decided to take a summertime cruise to Alaska so I whipped it up real quick and sported it while cruising by glaciers and sight-seeing in Anchorage. FUN! Sadly one of my pom ears got a little smooshed in my suitcase while traveling so my ears are a little lopsided in the pictures. But still cute!

So if you need something fun and stylish to protect you from the Arctic Blast, consider making your very own Mickey ears beanie (or bear ears – whatever)!
DIY Mickey Ears Beanie

Supplies
- Black Beanie hat (I found mine at Target)
- Black knitting yarn (one skein)
- Black thread & needle
- Scissors
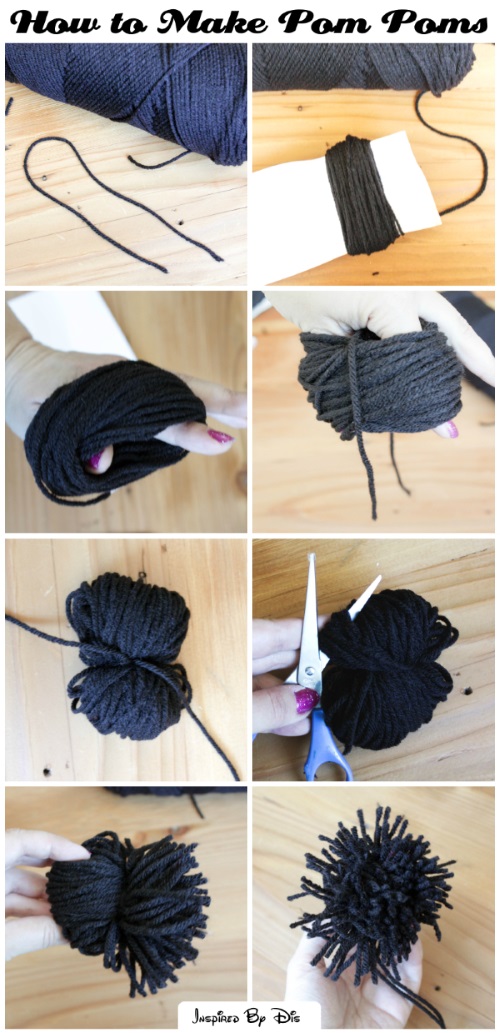
Steps
Step 1 – Cut a piece of yarn about eight inches long and set aside.
Step 2 – Now start on the poms. We are going to make two large poms from the black knitting yarn. Take the yarn and start wrapping it around something flat but sturdy. You can use your hand (hold the yarn with one hand and wrap it around the other hand) or a note pad about four inches wide, which is what I did. To make large poms like these, wrap the yarn around about 100 times. I know that seems like a lot, but you want your poms to be really full!
Step 3 – Slide the loop of yarn off and hold it between your thumb and pointer finger. Grab that eight inch piece of yarn from Step 1 and wrap it around the outside of the yarn loop in the middle, then pull the piece tight and tie in a knot. Make sure it’s as tightly around the yarn loop as you can get it. Then wrap the piece around again and tie in another knot. You can’t be too safe; you don’t want all your pom bits to start falling out. When you’re done, your yarn loop should look like a fat figure eight.
Step 4 – On each end of your yarn loop, use your scissors to cut through the loops all the way around. DO NOT CUT THE PIECE WITH THE KNOT. There should now be no yarn loops, and it should start to actually resemble a pom pom.
Step 5 – Trim all the way around the pom to make it even and round. When it’s even, you can cut the long pieces (that you used to tie the knot) to match.
Repeat Steps 1-5 for the second pom/ear.
Step 6 – Sew the poms to the beanie. I somehow failed to take pictures of this part of the process, so I apologize for that. My advice would be to put the beanie on and look in the mirror and see about where you want your ears. The beanie stretches, so they are going to be closer together than you would presume. Do your best to keep a finger in place when you’re removing the beanie so you remember where to sew on the pom. Using the black thread and needle, sew the pom to the beanie by threading through the middle knotted piece of the pom. Make four or five stitches through the pom and the beanie to make sure it’s on there real good. Repeat for the other side.
Stay warm, friends!
Beyoncé Image Source: WhereToGet.it