This post uses affiliate links.
I have been to several blogging conferences and the one thing I hear over and over and over and over and over again is that every blogger needs an email list. Collecting email address is so important, for so many reasons. One is that most readers simply aren’t going to check your blog every day and they will inevitably miss posts. Others prefer to be updated in one central location, like an RSS reader or in their email. But an email list is also handy because, as one blog conference speaker put it, “social media is temporary, but email is forever.” This really got me thinking. The majority of my traffic comes from Google, but after that it’s Pinterest and Facebook. What if Pinterest and Facebook went away? Eventually they will – nothing on the Internet truly lasts forever – but email is here for the long haul. What if you want to start a new blog, or a new business, or what if something goes wrong and your blog suddenly goes down and you need to communicate with your readers? Having an email list in your back pocket ensures you will never lose touch with your readers.
I have been blogging for nearly three years and I just now set up my email list. You guys, that’s really embarrassing. But the reason I kept putting it off is because I thought it was too complicated to set up. But finally, last weekend I decided to tackle it. And you know what? I was right. It’s complicated. But I figured it out and I documented the process, so now you can set up your own email list in just 15 minutes (or so) using Mail Chimp. Basically I did all the research for you, so with my guide, you can just breeze through it.
I should note that this is a very basic newsletter that will automatically send per your instructions (in this example, it’s weekly). Basically “set it and forget it.” If you want to personalize your newsletter every week, that is not going to be covered here. This is basic basic basic.
What you’ll need before you start:
– A free Mail Chimp account
– Your blog logo file (.jpg, .gif, or .png – no Photoshop files)
– Your blog’s feed URL. If you’re on WordPress, your RSS feed is most likely “http://www.yourblogurl.com/feed.” If you’re on Blogger, your RSS feed is most likely “http://blogname.blogspot.com/feeds/posts/default?alt=rss”
Setting up your email newsletter requires two items: a List and a Campaign. Then you will need to add the sign-up form to your blog so your readers actually see it. So the first step is setting up your list. This is the list of email addresses Mail Chimp will collect for your newsletter.
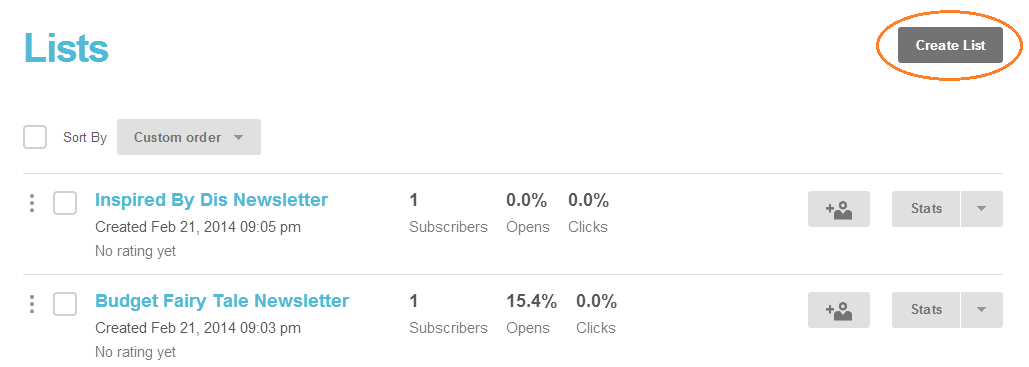
Step 1 – Log into your Mail Chimp account. On the main page, select Lists. Then click on “Create List.”
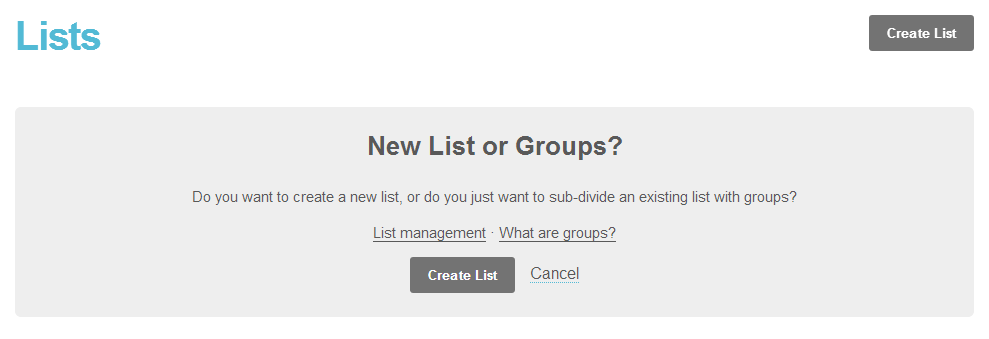
Step 2 – You will be asked if you want to create a new list or group. You want to “Create List.”
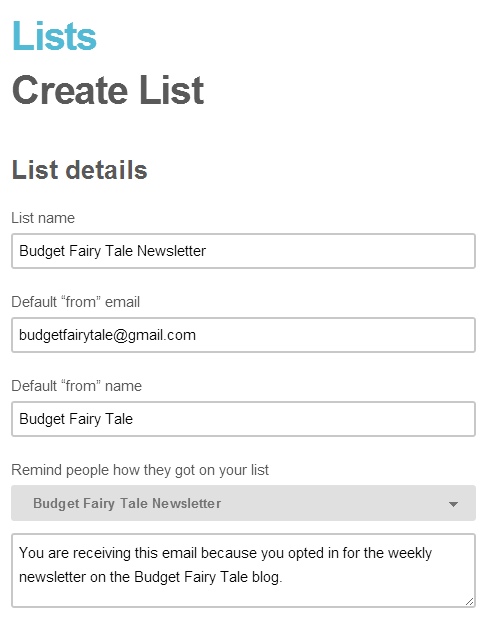
Step 3 – Fill out the List details. Give your list a name (“Your-blog-name Newsletter” works), use your blog’s email address as the Default “From” Email since this is what your readers will see (aka don’t use your personal email), your blog’s name as the Default “From” Name as this is what your readers will see as the sender in their in-box (don’t use your real name [unless your real name is also your blog’s name] because your readers don’t know YOUR name, they know your blog’s name. Make sense?). For the “Remind people how they got on your list” section, you can copy and paste this:
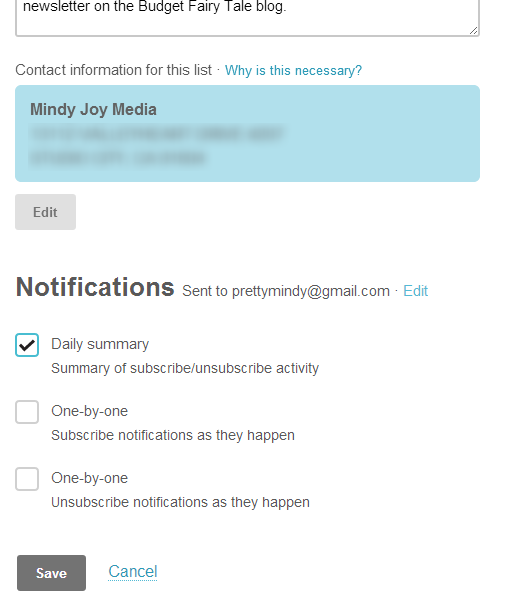
You are receiving this email because you opted in for the weekly newsletter on the YOUR BLOG NAME HERE blog.
Obviously if your newsletter is anything other than weekly, re-word the sentence accordingly.
Make sure your contact information is correct. You need a valid address for the U.S. CAN-SPAM Act. It can be a physical address such as where you live or conduct business, or a PO Box. You cannot make up an address. This is very important.
Select your Notification options. This is to control the emails YOU get as readers subscribe (or sadly unsubscribe) to your email list. I recommend the first option, which is a daily summary.
Click SAVE.
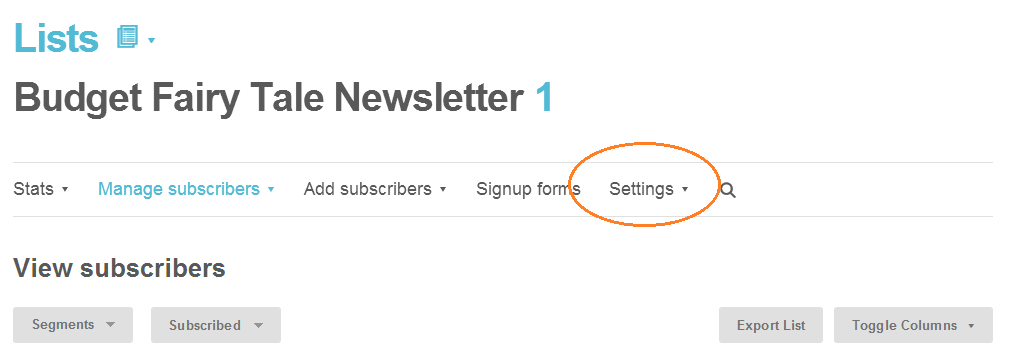
Step 4 – From here you will see your new list. Click on it, and select SETTINGS, then LIST NAME & DEFAULTS.
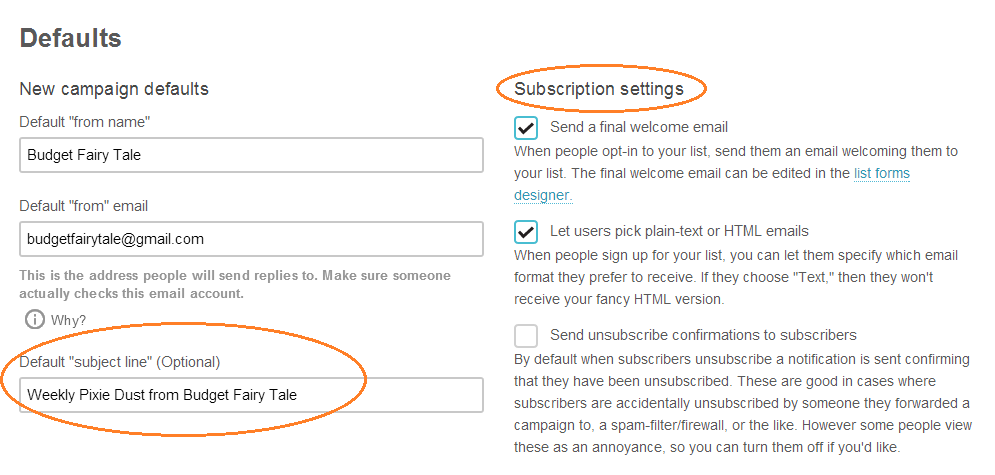
Step 5 – Go to the Default “Subject Line” field and type in something like “Weekly Updates from your-blog-name” or something clever along those lines. Then go over to Subscription Settings and make sure the first two options are checked off: Send a final welcome email and Let users pick plain-text or HTML emails. It’s up to you if you want to check off Send unsubscribe confirmations to subscribers. If a reader decides to unsubscribe or unsubscribes in error, they will get sent an email confirming their unsubscribed status. I personally CAN’T STAND IT when I get emails like that so I won’t subject my readers to it, either.
Scroll to the bottom and click SAVE.
You’re now done setting up your list and we can move on to the Campaign!
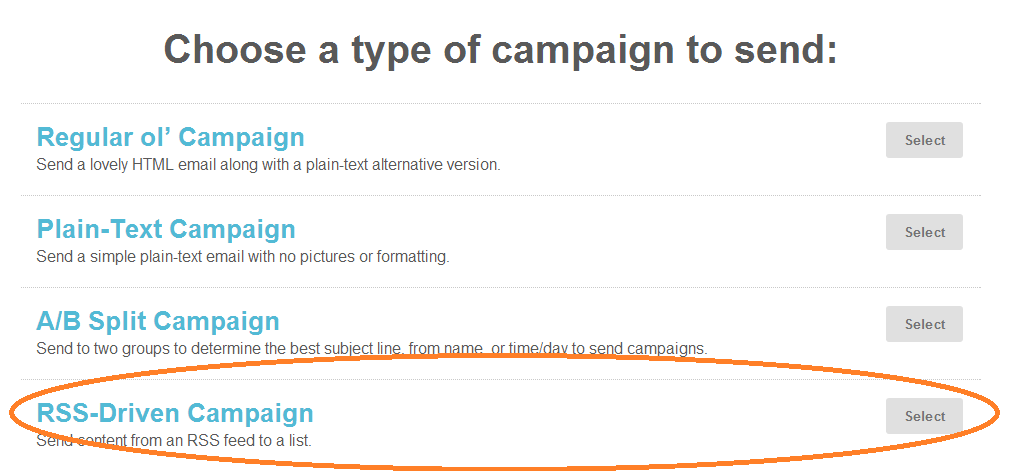
Step 1 – Click on CAMPAIGNS and select CREATE CAMPAIGN.
Step 2 – Select RSS-DRIVEN CAMPAIGN, the last option.
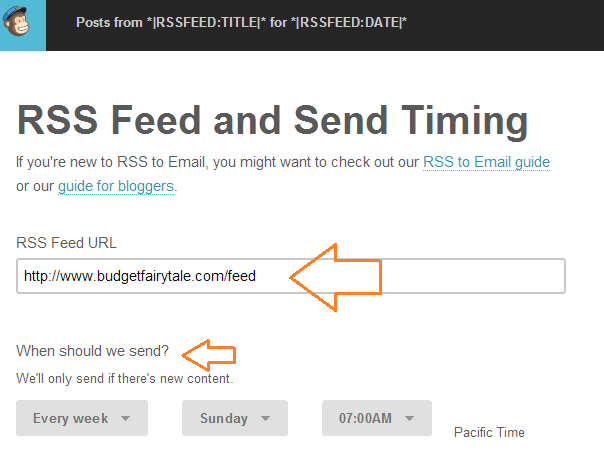
Step 3 – Enter your RSS Feed. If you’re on WordPress, your RSS feed is most likely “http://www.yourblogurl.com/feed.” If you’re on Blogger, your RSS feed is most likely “http://blogname.blogspot.com/feeds/posts/default?alt=rss”. If you’re still having trouble, you can click on the “RSS to Email guide” linked by MailChimp on that page. But the links above will work for the majority of blogs.
Decide when you want your campaign to be sent. Our example is a weekly email newsletter so I chose Sundays at 7am Pacific time. I had heard at a conference that Sundays are good days for email newsletters. But you should experiment and test out what works best for you and your audience. Click NEXT.
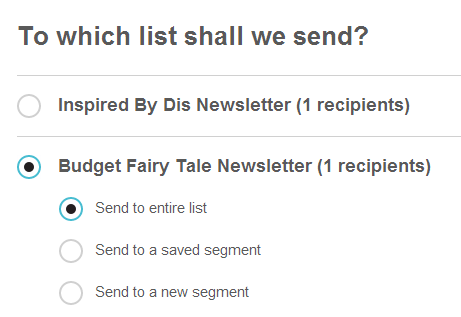
Step 4 – It will now ask you to which list you want the campaign sent. Choose the one you just created and “Send to entire list.” Click NEXT.
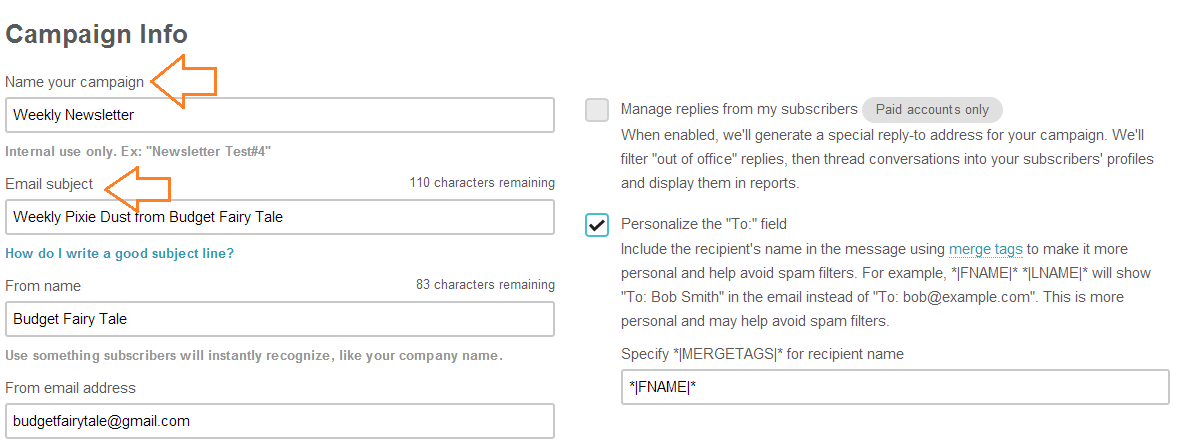
Step 5 – Fill out the “Name Your Campaign” and “Email Subject” fields. For Name Your Campaign I chose “Weekly Newsletter.” This is just for you to see, your readers will never see this name. So pick something simple but descriptive enough. For “Email Subject” you can write something like “Weekly Updates from Your Blog Name” or something clever like that. Your readers WILL see this, as the subject line. So make it interesting. That’s all you need to do on this page. Click NEXT.
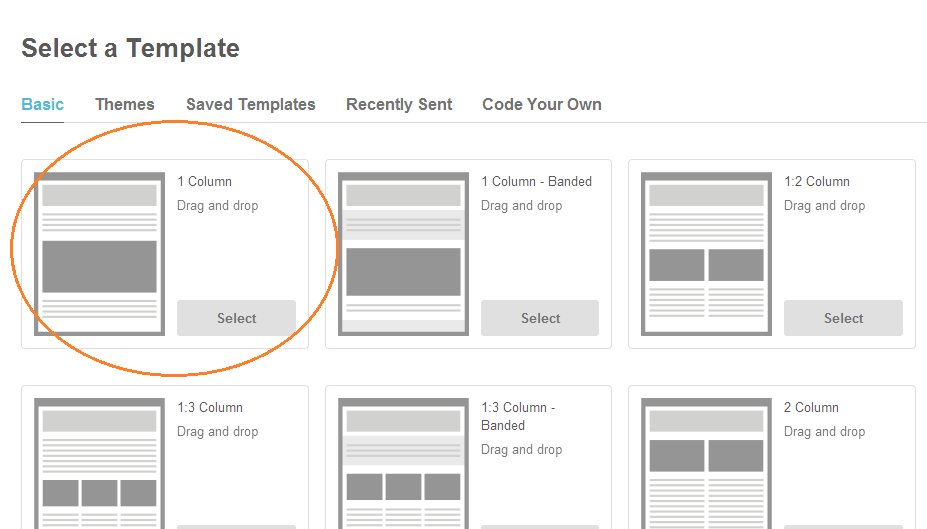
Step 6 – Select a template. The first one, “1 Column,” is fine. Click NEXT.
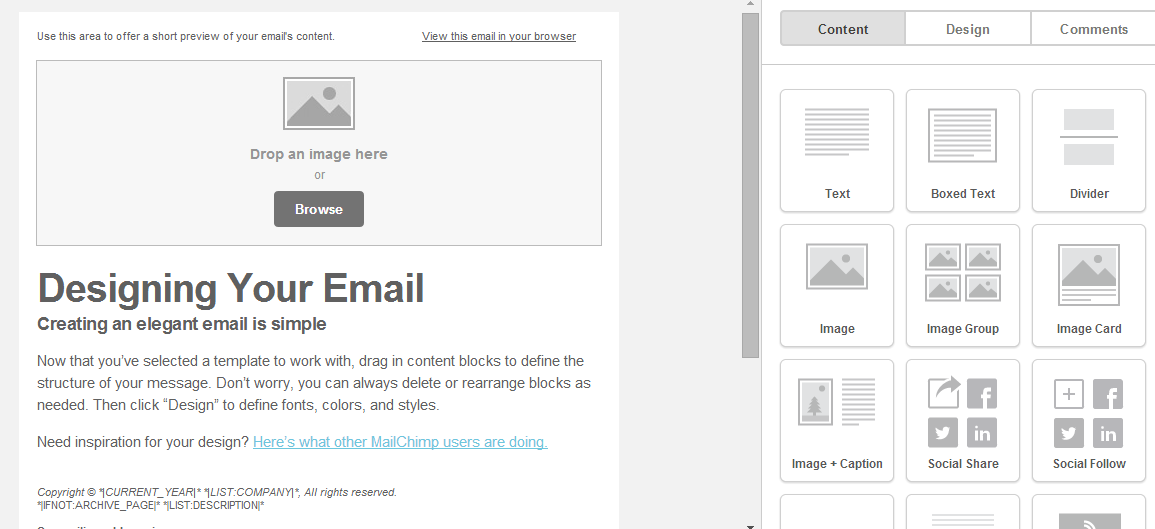
Step 7 – You’re going to see a very confusing page with lots of words and symbols. Don’t panic. We are now going to add your blog’s logo image to the top of the your newsletter. Look for the large text that reads “Designing Your Email” and click on the BROWSE button. Select your logo image from your computer. Once uploaded, you can edit the image by clicking the little pencil that appears when you hover your mouse pointer over the image. For example, if you want to center your logo, click on the little pencil, then click on “Settings” on the right side, and choose “Center” from the dropdown menu.
I also recommend changing the small text in the upper left to something a little more interesting. Simply click on that area and change the text in the field on the right side. Click SAVE & CLOSE.
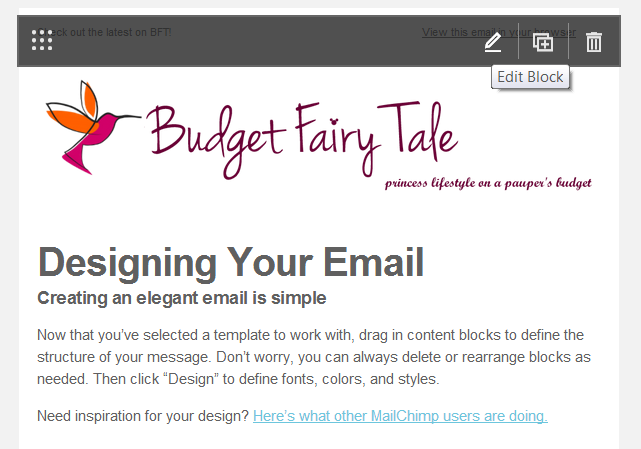
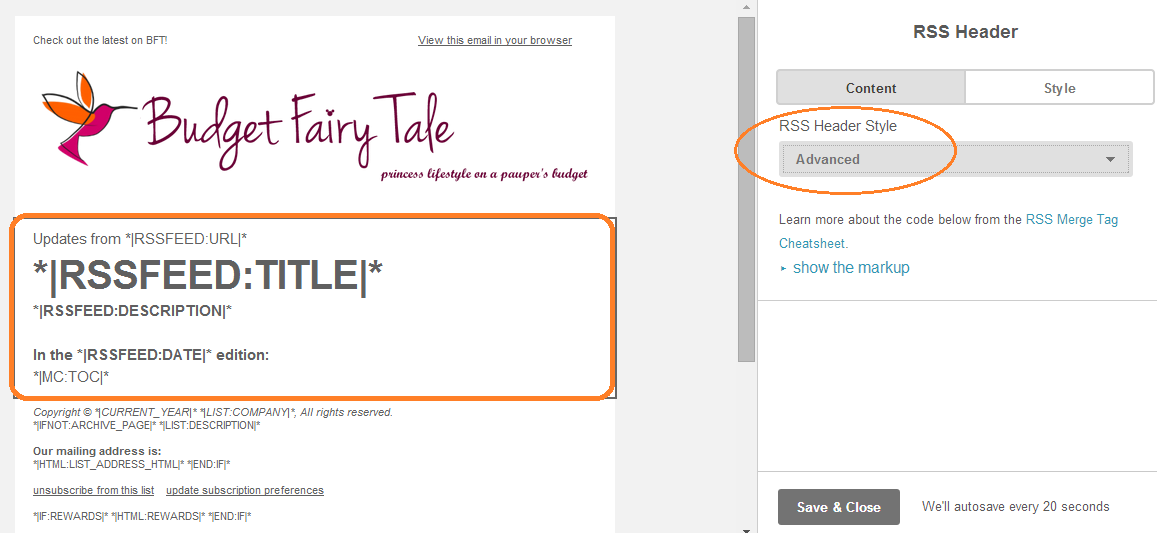
Step 8 – Hover over the field where it has the large “Designing Your Email” text and click the trash can icon to delete it. On the right side, under CONTENT, you should see a square for RSS HEADER. Drag and Drop this into the “Drop Content Blocks Here” area on the left. Select the little pencil for this new block and now under CONTENT on the right side it should have a RSS HEADER STYLE dropdown menu. Select ADVANCED. It will result in a bunch of funky looking coding on the left side but if it says “*|RSSFEED:TITLE|*” really big under your logo then you did it right. Click SAVE & CLOSE.

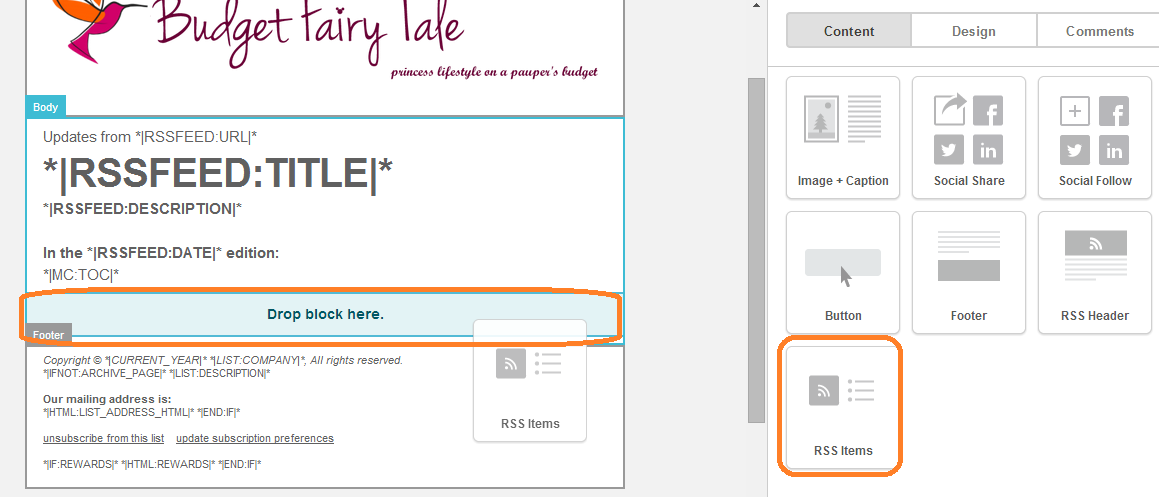
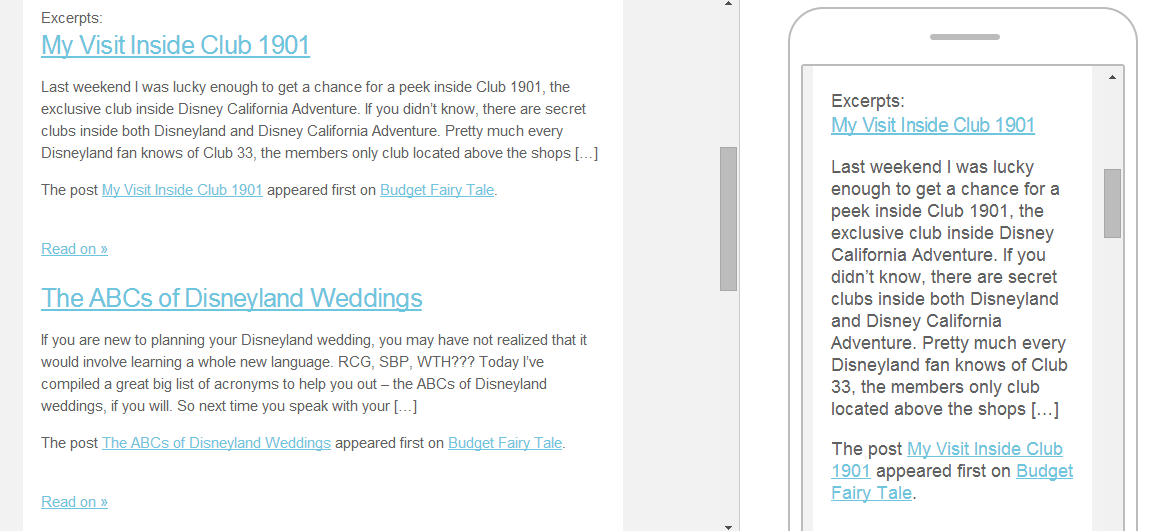
Step 9 – We need to drag and drop one more block. On the right side scroll all the way down and find the RSS ITEMS button. Drag and drop that into the block just below the other one you just added. Click on the little edit pencil and under RSS ITEMS STYLE select EXCERPTS. This means only the beginning of your posts will show up in your email newsletters, which mean your readers will need to visit your blog if they want to read the entire post. HOWEVER this is personal preference, and if you want to include the entire post content that is up to you. Click SAVE & CLOSE.

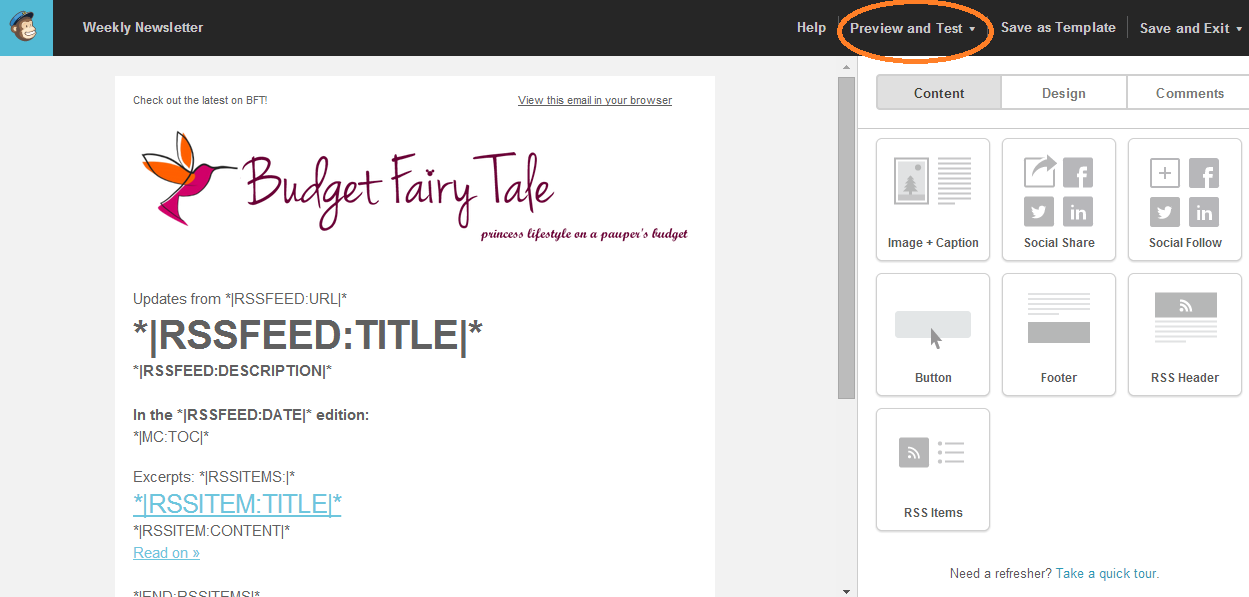
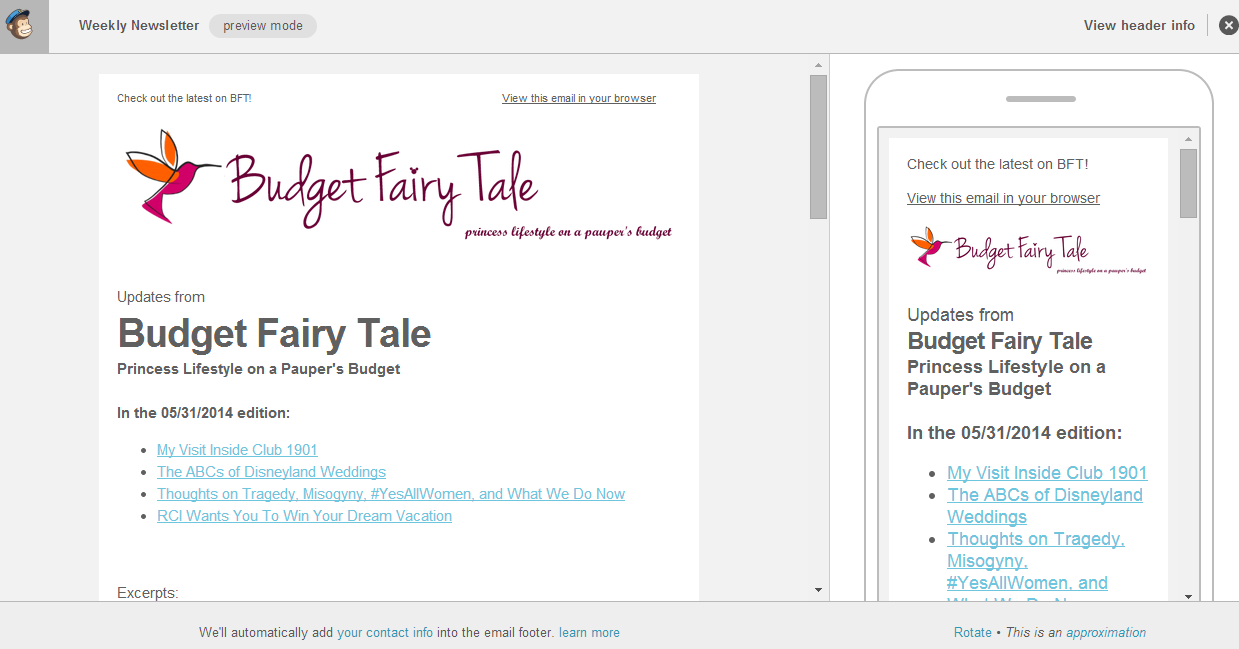
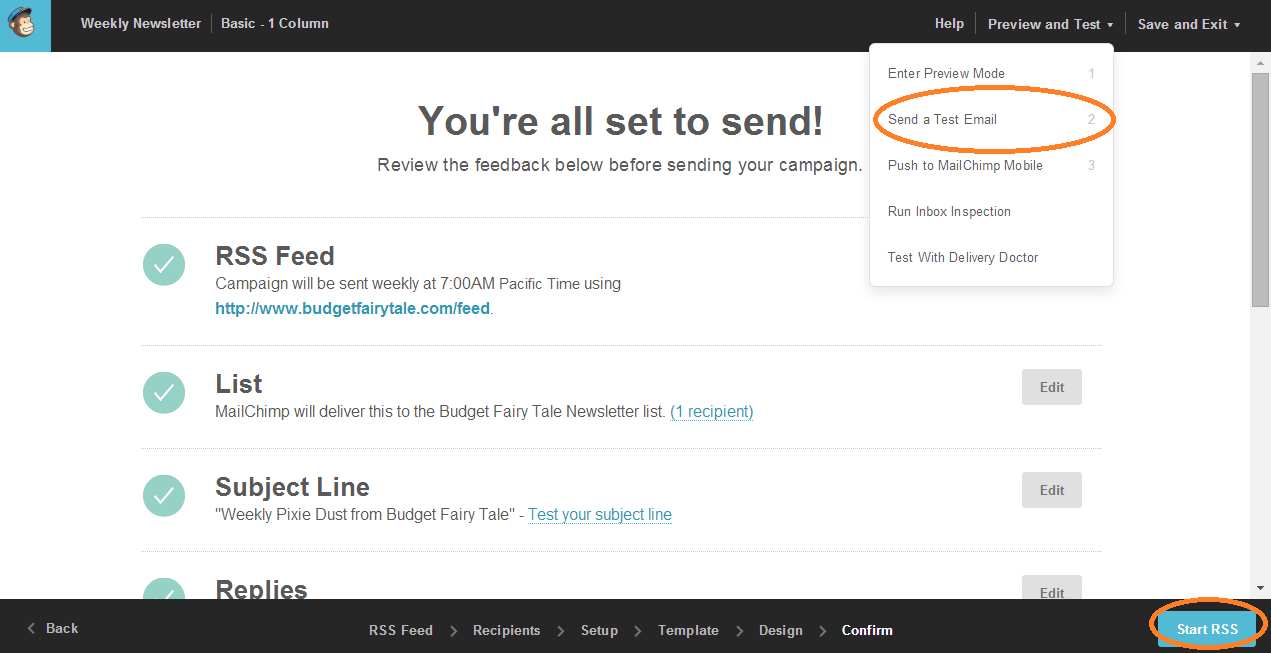
Step 10 – Before you leave this screen, I highly recommend doing a preview of your newsletter. Click on PREVIEW AND TEST in the top right menu options, and select ENTER PREVIEW MODE. From here you can see exactly how your newsletter will look on people’s computers and mobile screens. Scroll through and make sure you like it. If anything looks weird or you get any errors, go back though the steps carefully to make sure you didn’t miss anything. You can exit Preview mode by clicking the X in the right top corner. Click NEXT when ready.
Step 11 – Yay, you’re almost done! Now you just need to review everything to make sure you’re happy with the settings. I also recommend sending a test email to yourself using the PREVIEW AND TEST drop down before you finalize everything. When you’re ready to pull the trigger, click START RSS. (Don’t worry if you realize something is wrong later – you can always pause and edit your campaign at any time.)
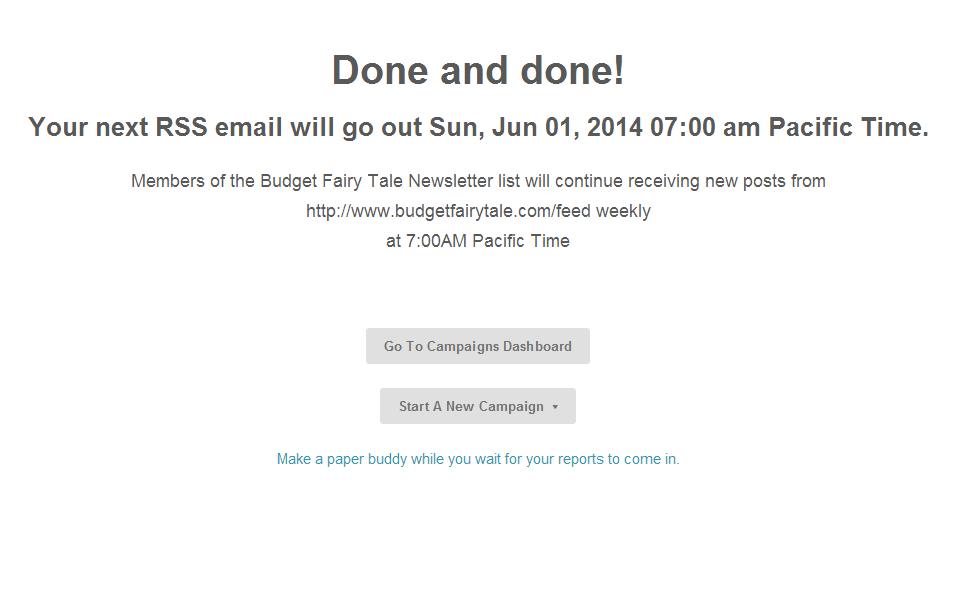
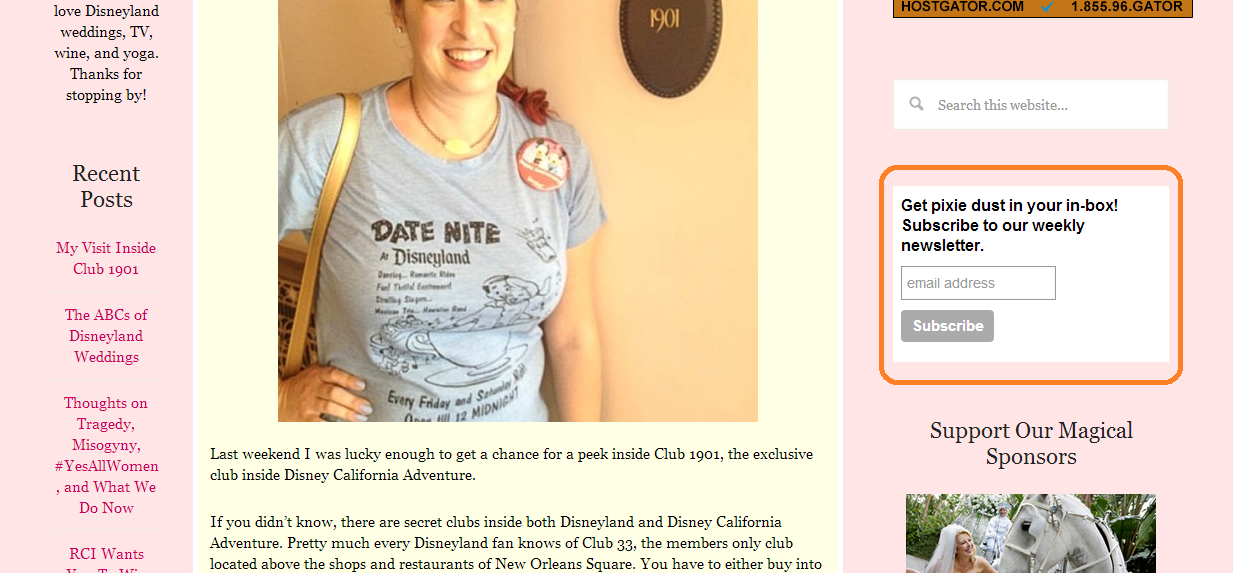
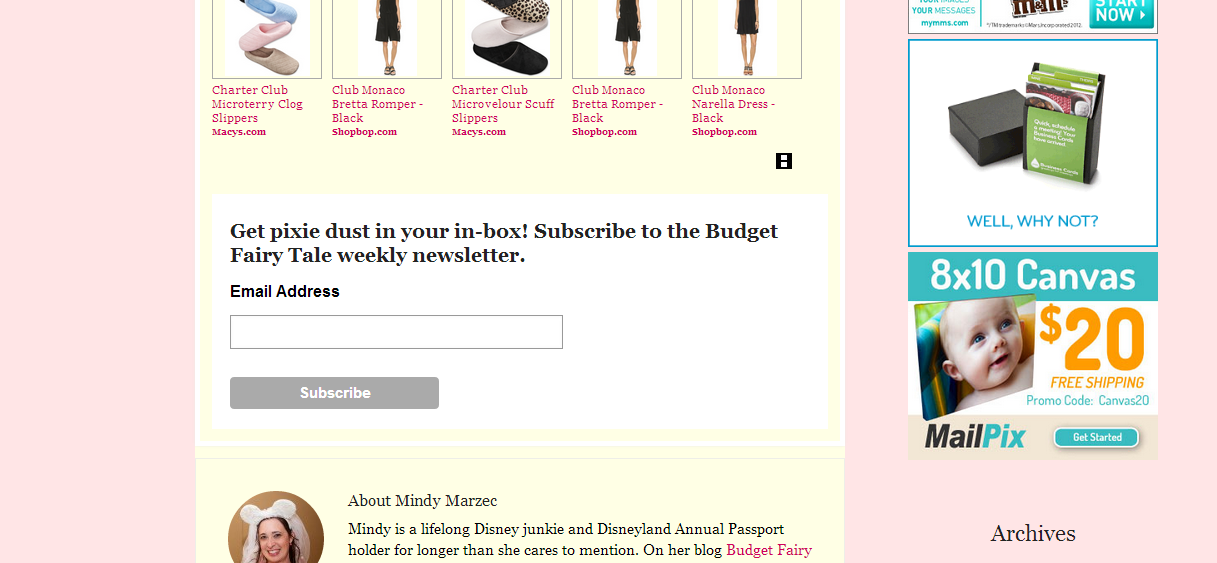
Congrats, your email list is ready for subscribers! So how the heck do you get them? Your best bet is to put a sign-up form on your blog somewhere. I recommend having it in your sidebar, at the bottom of each post, and also on your About Page.
At this point I’ll teach you how to find the default sign-up forms on Mail Chimp. But for the long term, I recommend creating a unique graphic that matches your blog’s branding.
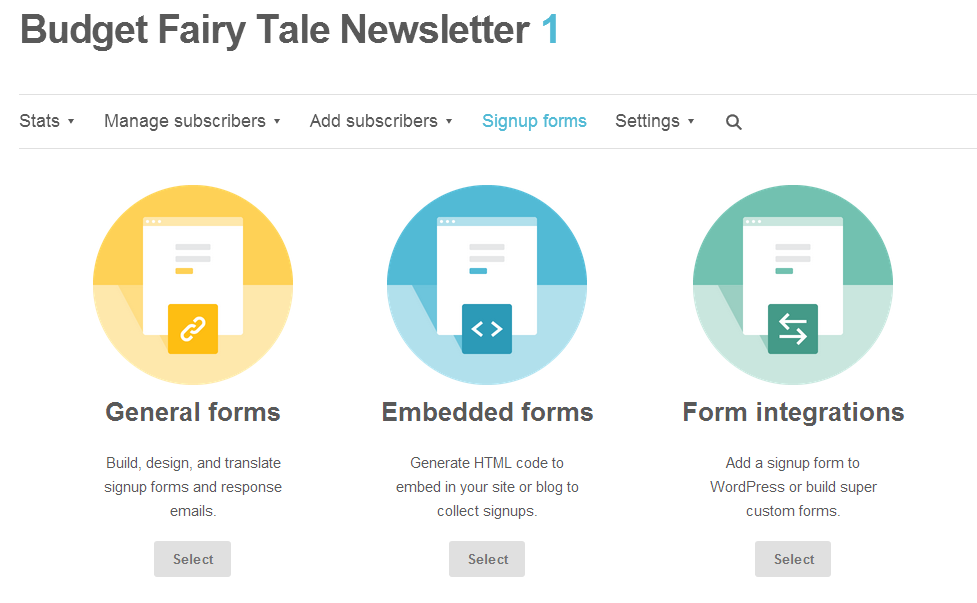
Step 1 – Go to LISTS, then find your corresponding email list, then click STATS on the right side, then select SIGNUP FORMS from the dropdown menu.

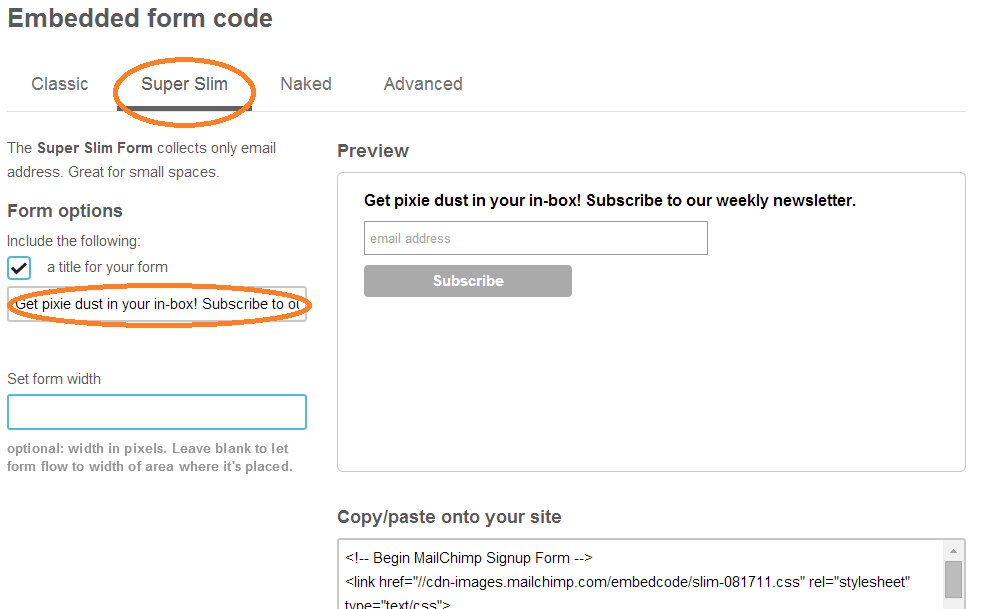
Step 2 – Select EMBEDDED FORMS.
Step 3 – Select SUPER SLIM (this is my favorite form but you may choose whatever you prefer). Change the title to something enticing and personal. I recommend stating how often the newsletter will be going out. A lot of readers are hesitant to subscribe to an email list for fear they will get multiple emails a day.
Select the code and place it into a text widget on your blog in the desired location. Preview your blog to make sure it looks okay.
And you’re done! Your blog is now ready and willing to collect email addresses. Isn’t it exciting? Give yourself a little pat on the back for taking the time to do this super important step in building your business.
Just a heads up, you might expect to start getting dozens of new subscribers every day. This probably won’t happen at first! Be sure to let your social media follows know you’ve got a fancy new email list so your hardcore fans can sign up. Subscribers will trickle in, don’t worry! Just remember the best time to start collecting emails is RIGHT NOW. You are never “too small” to start.
I hope this tutorial helped you. If you have any questions or comments, please let me know.
Are there any other blogging tutorials or tips you would like to see? I love to help!
Photo source: Unsplash
*I am an affiliate with Mail Chimp. This means I earn account credit for every new paying customer who signs up with Mail Chimp using the affiliate links within this post or elsewhere on my websites.