This post contains affiliate links.

If you’re like me, you have a handful of old and new Disney pressed pennies in a drawer somewhere. They are one of the best souvenirs in the Disney Parks … they are cheap, and small, and sturdy. But, what do you do with them? I decided to try turning mine into jewelry, and I’m in love with the result! With the right supplies, this is an easy project. But be careful, it’s addicting! You can’t make just one. I’ve made three necklaces and two bracelets so far, and I think I will try earrings next.
My favorite, by far, is the Walt’s Signature necklace. You can find this pressed penny at Disneyland between Great Moments with Mr. Lincoln and Mad Hatter Shop. (Note – this machine doesn’t appear to be available any longer but you can ask for a Pressed Penny Machine map from City Hall to find other awesome designs.)

Supplies

- Pressed pennies
- Jewelry chain (I used Bead Landing brand chain in “chocolate”) This is similar
- Jewelry jump rings and clasps (lobster and magnetic) to match your chain – I bought all these jewelry supplies at Michaels
- Needle-nose pliers
- Metal punch pliers
Steps
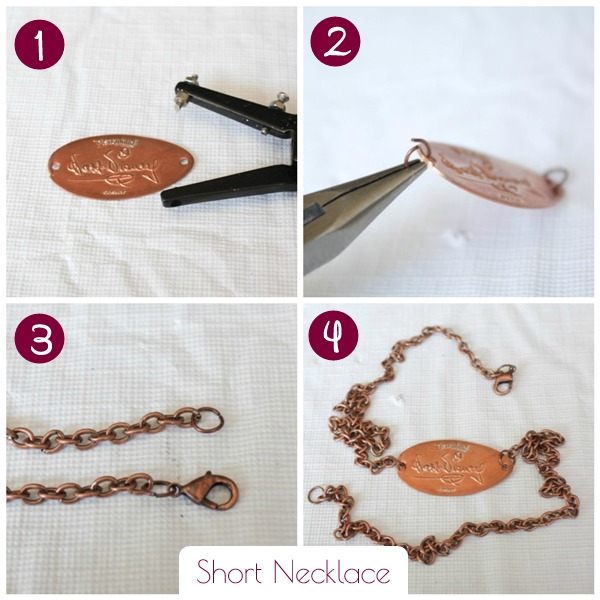
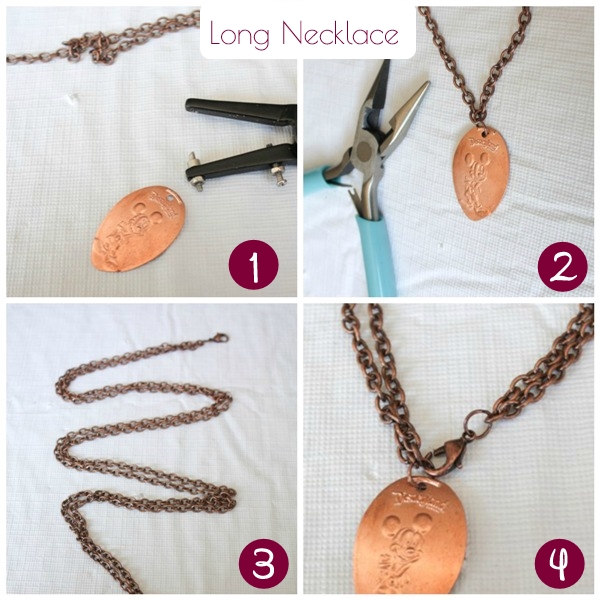
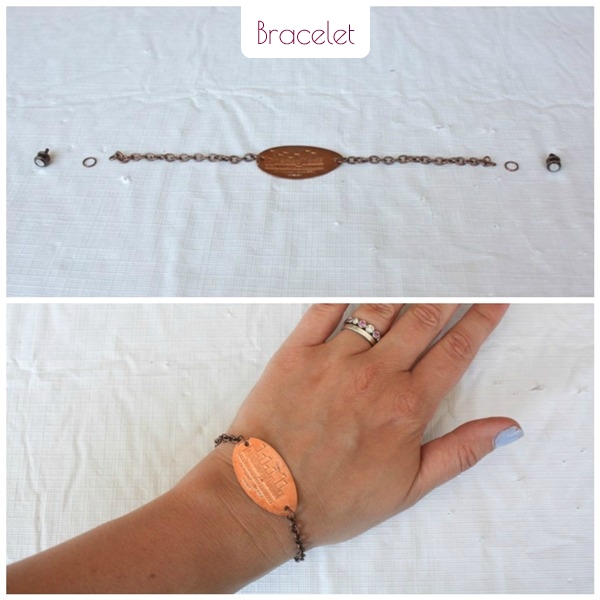
Step 1 – Decide what type of jewelry you want to make and punch holes in your pennies accordingly. If you want to make horizontal penny necklace or bracelet, make punches at both ends of the penny. If you want to make a vertical penny necklace (or maybe earrings), punch a hole at the top of the penny.
Step 2 – Secure a jump ring to each hole.
Step 3 – Decide on the length of your chain by measuring around your neck or wrist. Use the pliers (or clamp pliers if you have them) to break apart one of the links so you have a chain piece in your desired length. Remember you can always take away chain but it’s tough to add chain.
Step 4 –
Short necklace: Attach one end of the chain to the jump ring on one side of the penny, and the other side of the chain to the jump ring on the other side of the penny, making a circle. Use your pliers to separate the chain in the middle (the part that will go against the back of your neck) and apply jump rings and the clasp.
Long/short convertible necklace: I like versatility so I decided to make a necklace I could convert from long to short. I measured out enough chain to fit around my neck so the penny was sitting close to my waist. I then used a jump ring to attach both ends of the chain to the penny. If you just want a long necklace you can stop here. If you want to make it convertible, lay your necklace flat and straight, so the two sides of the chain are next to each other. Where the chain curves (at the “top”), attach a jump ring and a lobster clasp. When you wear it long, the clasp will go unused. To make the necklace short, simply wrap the double chain around your neck and clasp to the jump ring attached to the penny.
Bracelet: Like the short necklace, attach one end of the chain to the jump ring on one side of the penny, and the other side of the chain to the jump ring on the other side of the penny, making a circle. Use your pliers to separate the chain in the middle and apply jump rings and the clasp. I prefer magnetic clasps for bracelets, they are SO much easier to put on and take off!
For all jewelry, you may need to remove (or even add) links to get the jewelry sized to your perfect fit. This part takes a little patience but it will be worth it in the end.
